Can you capture the majesty of a German Shepherd on paper? Whether you’re an aspiring artist or a dog lover, drawing this iconic breed can be a fun and rewarding experience.
To get started, you’ll begin by sketching basic shapes. Use circles and ovals to outline the head, body, legs, and tail. This foundational step helps establish the overall proportions and structure of your dog drawing.
As you progress, you can refine the details. Add features like the muzzle, ears, and facial expressions. With practice and patience, you’ll be able to create a realistic and engaging German Shepherd drawing.
Key Takeaways
- Start by sketching basic shapes to outline the dog’s structure.
- Use circles and ovals for the head, body, legs, and tail.
- Refine details by adding features like the muzzle and ears.
- Practice patience to achieve a realistic drawing.
- Follow a step-by-step approach for best results.
Understanding German Shepherd Anatomy
Knowing the anatomy of a German Shepherd is key to drawing it well. You need to understand its physical traits and how its parts fit together.
Key Physical Characteristics
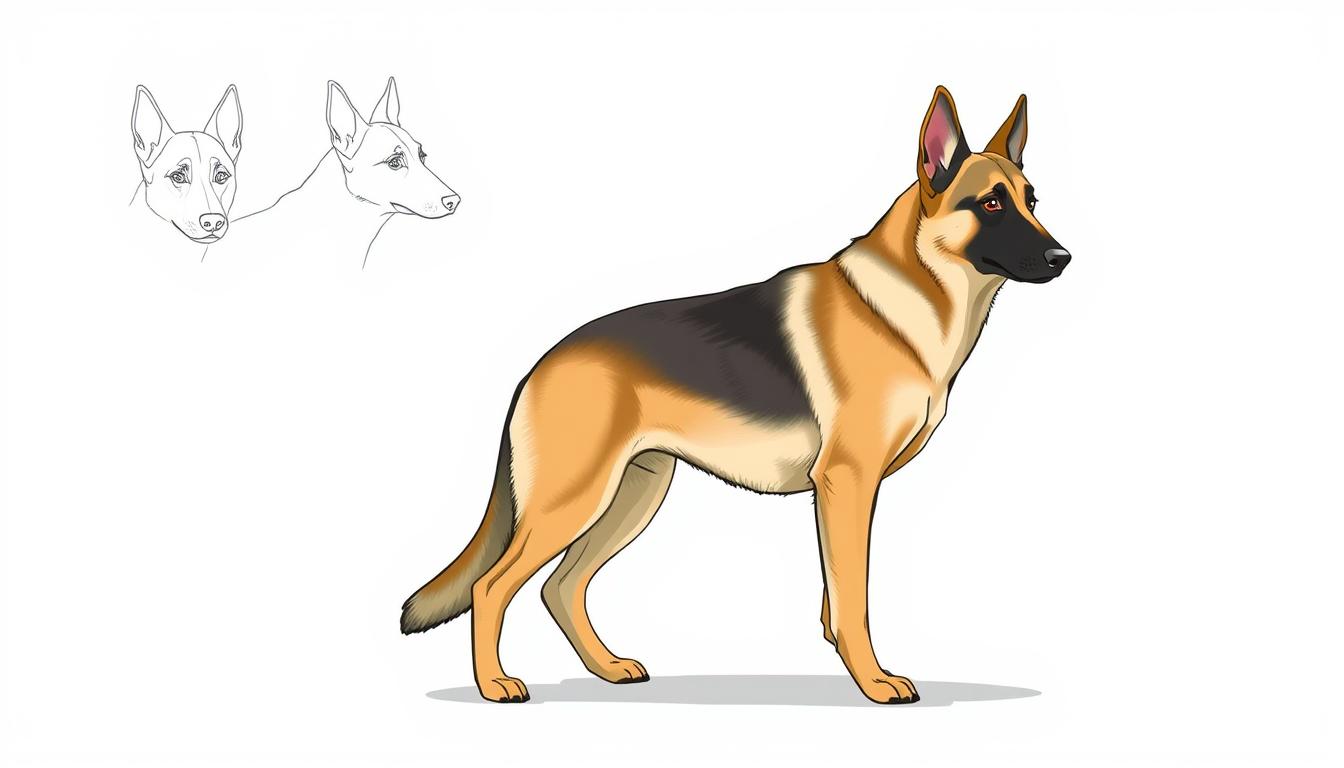
German Shepherds are known for their strong build and unique coat patterns. They have big ears that stand up and point forward, making them look alert. Their muzzle is about one-third the size of their head, which is important to get right in your drawing.
Proportions and Structure
The right proportions are vital for drawing a German Shepherd. The head to body ratio, leg length, and muscle structure all matter. Getting these right will make your drawing look more real.
Breed-Specific Features
Features like ear shape, tail, and coat pattern are key to drawing a German Shepherd. They have a double coat, with a thick undercoat and a rough outer coat. Drawing these accurately will help capture their true look.
By focusing on these details, you can create a drawing that’s both realistic and engaging.
Essential Materials for Drawing a German Shepherd
To make a beautiful German Shepherd drawing, you need the right tools. The quality of your drawing depends on the materials you use.
Recommended Drawing Tools
You’ll need pencils (HB, 2B, 4B, 6B), a sharpener, and an eraser for traditional drawing. You can also use sketching pens or charcoal for different looks.
Paper Selection
Choose high-quality paper that can handle your tools. Look for paper with a smooth finish and at least 80 gsm weight. This prevents bleed-through and makes your drawing last longer.

Optional Digital Alternatives
If you like digital drawing, try a graphics tablet or software like Adobe Photoshop or Clip Studio Paint. These tools let you add many effects to your German Shepherd drawing.
Finding the Perfect Reference Photo
A good reference photo is key to a realistic German Shepherd drawing. You need a clear, well-lit image of the dog to get it right.
What Makes a Good Reference Image
A high-quality reference image should have good lighting and be in focus. Look for images that capture the dog’s expression and posture. These details will make your drawing more lifelike.
Sources for Quality German Shepherd Photos
You can find excellent reference images online or use your own photos. Some great sources include:
- Stock photo websites
- Dog breeders’ and trainers’ websites
- Pet photography portfolios
When using online sources, make sure the images are high-resolution and relevant to your drawing.
Using Multiple References
Using multiple reference images can help you create a more accurate drawing. Consider gathering images that show the dog from different angles and in various poses. This will help you capture the dog’s anatomy and movement better.

Preparing Your Workspace for Optimal Drawing
A well-prepared workspace can make a big difference in your drawing. To draw your best German Shepherd, make sure your environment is both creative and comfortable.
Lighting Considerations
Good lighting is key to avoiding eye strain and improving your drawings. Natural light is best, but a high-quality desk lamp works well at night.
Ergonomic Setup Tips
An ergonomic setup prevents discomfort and injury. Choose a comfy, ergonomic chair. Place your drawing surface at a height that keeps your back and neck straight.
Organizing Your Materials
Keep your drawing materials tidy and close by. This includes pencils, erasers, paper, and more. A clean workspace helps you focus on your drawing.

Step-by-Step Guide: Drawing a German Shepherd
Learning to draw a German Shepherd is easier when you break it down into steps. This guide will show you the key stages, from the first sketches to the final touches.

Overview of the Process
To begin drawing a German Shepherd, start with basic shapes. Use circles and ovals to draw the head, body, legs, and tail. This step is important for getting the proportions right.
Time and Patience Requirements
Creating a realistic German Shepherd drawing takes time and patience. You might need several hours or even days to get it right. Here are some tips:
- Give yourself time for each part of the drawing.
- Practice often to get better.
- Be kind to yourself as you work on the details.
Skill Level Considerations
Whether you’re new to drawing or have experience, drawing a German Shepherd can be fun. Think about your skill level and be ready to learn and practice. Here are some suggestions:
- Begin with simple exercises to learn the breed’s features.
- Use reference images to make your drawing more accurate.
- Try different techniques to get the look you want.
By following this german shepherd art guide and practicing, you can create a stunning and accurate German Shepherd drawing.
Starting with Basic Shapes and Forms
Basic shapes are the foundation of any drawing, including a German Shepherd. They help you get the proportions right from the start. Breaking down a complex subject like a German Shepherd into simple forms makes it easier.

Creating the Circle and Oval Framework
Start by drawing a big circle for the German Shepherd’s head. This circle is the base for the rest of your drawing. It helps you get the proportions right. Use ovals for other body parts, like the body and limbs.
These basic shapes help you sketch the overall posture and proportions of your German Shepherd. You can then add more details.
Establishing Proper Proportions
To draw an accurate German Shepherd, start with the right proportions. The circle for the head should match the size of the ovals for the body. A German Shepherd’s body is usually longer than it is tall. So, your body oval should reflect this.
- Measure your circle and oval shapes to ensure they’re in proportion.
- Adjust the size and placement of these shapes as needed to achieve a balanced look.
Connecting the Basic Shapes
With your basic shapes in place, start connecting them to form your German Shepherd. Draw lines to link the circle (head) to the oval (body) and add the limbs. Connecting these shapes will reveal the dog’s structure.
Key steps to follow:
- Sketch the head and body shapes.
- Connect these shapes with gentle, flowing lines.
- Add the limbs, using ovals or cylindrical shapes as guides.
Starting with basic shapes and forms helps you draw a more accurate and balanced German Shepherd. This foundational step is key for a realistic drawing.
Crafting the German Shepherd’s Head
The German Shepherd’s head is a key feature. Getting it right is essential for a realistic drawing. You’ll need to focus on several important details.
Shaping the Muzzle
Begin by shaping the muzzle, which is about one-third of the head’s size. Use a small circle or oval as a guide for the right proportions. The muzzle must fit well with the head’s structure, so take your time.
Drawing the Distinctive Ears
German Shepherds are famous for their big ears. When drawing the ears, focus on their size, shape, and position. They should be erect and alert, adding to the dog’s expression.
Adding Facial Guidelines
To align facial features, add facial guidelines. These help place the eyes, nose, and mouth correctly. Start with a line down the head’s center, then add lines for the eyes and other features.
As you refine the head, keep your lines soft and smooth. Use simple details for the eyes, nose, and mouth. Focus on their positions and sizes.

By focusing on these key elements, you’ll create a realistic and engaging head. This will capture the essence of the German Shepherd breed.
Detailing Facial Features
The facial features of a German Shepherd are key to capturing its expression and character. To draw it realistically, focus on the eyes, nose, mouth, and other details. These details bring your drawing to life.
Drawing Expressive Eyes
The eyes are like windows to the soul in a German Shepherd drawing. They show emotion and intelligence. Start by sketching curved lines for the shape, making them almond-like and slightly angled.
Shade a circle within each eye to form the pupils. Focus on the highlights to give the eyes depth and life.

Creating the Nose and Mouth
The nose and mouth complete the facial expression of your German Shepherd. The nose should be dark and moist, with a slight sheen. When drawing the mouth, make sure the lips are firm and the jawline is strong.
These details make your drawing more realistic and engaging.
Adding Character Through Facial Details
To add character to your drawing, focus on small details. Include wrinkles around the eyes and mouth, and the texture of the fur around the face. Use short strokes to suggest fur texture, like around the neck and back.
Also, use different shading techniques to show the depth and dimension of the facial features.
- Use curved lines to sketch the eyes and ensure they are expressive.
- Pay attention to the proportions and placement of the nose and mouth.
- Add subtle details like wrinkles and fur texture to enhance character.
Developing the Body Structure
Drawing a German Shepherd’s body means understanding its strong muscles and athletic look. You need to focus on the main parts that make up its body.
Shaping the Chest and Back
The chest and back of a German Shepherd are very strong and muscular. To draw them right, use smooth, curved lines for a natural look. The chest should be deep and clear, and the back should be strong and slightly curved.
Drawing Strong, Muscular Legs
German Shepherds have powerful legs, which help them move quickly and easily. When drawing the legs, remember their size and muscle. Use curved lines to show the fur and muscles.
Creating Proper Body Proportions
To make your German Shepherd drawing look real, keep the body parts in balance. The chest, back, and legs should match well, making the posture look natural. Here are some tips:
- The chest should be deep and well-sprung.
- The back should be strong and slightly arched.
- The legs should be muscular and well-proportioned.
By focusing on these points and using the right techniques, you can draw a more realistic and lively German Shepherd.
Adding the Tail and Paws
The tail and paws are key to making your German Shepherd drawing come alive. They need careful detail to look right.
Drawing a Natural Tail Curve
To draw the tail, start with a long, curved line. It should follow the natural curve of the German Shepherd’s tail. The line should be smooth, showing the muscles underneath.
You can add short, curved lines along the tail. These suggest the fur, making it look more real.
Detailing the Paws and Toes
When drawing the paws, focus on their shape and size. German Shepherds have oval paws with arched toes. Start by outlining the overall shape, then add the toes.
Make sure to leave a gap between the toes. This creates a natural look.
Capturing Natural Posture
To capture the German Shepherd’s natural posture, balance the tail and paws with the body. The tail should follow the back’s line. The paws should show movement or stability, depending on the pose.
Use reference images to see how the tail and paws align with the body’s posture.

By focusing on these details, you’ll create a more realistic and engaging German Shepherd drawing.
- Use smooth, flowing lines for the tail.
- Pay attention to the shape and proportions of the paws.
- Ensure the tail and paws are in balance with the rest of the body.
Creating Realistic Fur Texture
To make your German Shepherd drawing come alive, mastering fur texture is key. The fur of a German Shepherd is unique, needing detailed attention to look real.
Short strokes are a main technique for realistic fur texture. These strokes should follow the fur’s growth direction. They should vary in length and density to match the German Shepherd’s natural coat.
Short Stroke Techniques
Effective short strokes require understanding fur direction and length. The fur on a German Shepherd’s neck and back is longer and denser. Begin with light strokes to outline the fur’s direction, then add darker, more defined strokes.
Capturing the German Shepherd’s Coat Pattern
The German Shepherd’s coat pattern varies but often includes black, tan, and white. To get this right, focus on color transitions and use strokes to define these areas clearly.
Remember, layering is essential for fur texture. Start with the base color and add shading and texture layers for depth and dimension.
Adding Volume to Neck and Back Fur
The fur on a German Shepherd’s neck and back is notable for its volume and texture. Use layered short strokes, starting from the base and moving outwards. This creates a natural, voluminous look.
As artists who draw pets say, “Capturing fur texture is about more than skill; it’s about the animal’s character and showing that in your art.”
“The way the light falls on the fur, the way it shadows the underlying structure, all of these elements come together to create a truly lifelike representation.”

By focusing on these points and practicing short strokes, you’ll make a more realistic and engaging German Shepherd drawing. This will capture the essence of this beloved breed.
Shading and Adding Depth
Learning to shade is key for depth in your German Shepherd drawing. Shading adds dimension and realism.
Understanding Light Source and Shadows
To shade well, first grasp the light source and its shadow effects. Figure out where the light comes from and see the shadows it makes. This knowledge helps your shading look natural and real.
Focus on darker areas like under the ears and belly. These spots have deeper shadows. Knowing this helps you draw a more realistic German Shepherd.
Techniques for Natural-Looking Shading
Several methods can make your shading look natural. Hatching and cross-hatching are key. They involve lines that follow your subject’s shape. The line density and direction create shades and textures.
For a German Shepherd, notice the fur’s texture and tone. Quick strokes capture the coat’s texture. Changing your tool’s pressure gets different shades.
Using Blending Tools Effectively
Blending tools smooth out shading for a realistic look. Tools like blending stumps or tortillon blend shading softly. This reduces harsh lines for a softer look.
Be gentle with blending tools to avoid a muddy or undefined look. Practice makes perfect with these tools.
Understanding light, using shading techniques, and blending tools add depth to your German Shepherd drawing. With practice, your drawings will be detailed and full of dimension and realism.
Coloring Your German Shepherd Drawing
Now that you’ve learned to draw a German Shepherd, it’s time to add color. This step can make your drawing look more real and appealing. You can use traditional methods or digital tools, depending on what you like and what you have.
Traditional Coloring Methods
Traditional coloring uses materials like colored pencils, markers, or paints. Colored pencils are good for detailed colors, while markers give bold colors. Start with a light layer and build up to avoid too much color.
Some popular tools for traditional coloring are:
- Colored pencils for detailed work
- Markers for bold colors
- Watercolor paints for a soft look
Digital Coloring Techniques
Digital coloring lets you try many colors and styles. With software like Adobe Photoshop, you can digitally paint your drawing. It’s great for trying new things and fixing mistakes easily.
Digital coloring has many benefits, including:
- Easy to undo and redo
- Many digital brushes and textures
- Work in layers for complex colors
Capturing Authentic German Shepherd Coloration
German Shepherds have unique colors like black and tan, solid black, or white. When coloring, aim to get the breed’s colors right. Use pictures to help you choose the right colors.
Most German Shepherds are black and tan. But some are solid black or white. To get the colors right, follow these tips:
- Look at pictures of German Shepherds to learn their coat patterns
- Use layering and blending for a natural look
- Focus on the small details of color and texture in their coat
Common Mistakes to Avoid When Drawing German Shepherds
To draw a German Shepherd well, knowing common mistakes is key. These errors can make your drawing less realistic. By avoiding them, you can create a more engaging piece.
Proportion Errors
One big mistake is getting the proportions wrong. Make sure the head fits right with the body. Focus on the head-to-body ratio for a more accurate drawing.
Fur Pattern Misconceptions
German Shepherds have a unique fur pattern. To get it right, study reference images and practice strokes. Knowing fur direction and length is essential for a realistic look.
Shading Pitfalls
Shading is critical for realism. Watch out for common shading mistakes like uneven or unnatural shading. Knowing your light source is key. Practice shading to get a natural look.
Knowing these mistakes and avoiding them can greatly improve your German Shepherd drawings. Take your time and be patient with your art.
Conclusion
With practice and patience, you can make a realistic and engaging German Shepherd drawing. This tutorial has shown you how to capture the breed’s unique features. You’ve learned the essential steps.
Keep practicing and remember to use reference images. Try different techniques to get better at drawing dogs. Drawing a German Shepherd needs attention to detail. But with each try, you’ll get more confident.
Regular practice will make your skills better. You’ll be able to draw beautiful and accurate pictures. So, keep practicing and you’ll see your skills improve with each new drawing.